Mockery In The Black
Development Period:
Team:
Aug 2021 - Apr 2022
Engine:
PenguinShark (9 students)
-
5 programmers
-
3 designers
-
1 sound designer
Unreal Engine
Position:
UI & Tools Programmer
Technology:
Tortoise SVN, DevOps Boards, Wwise, Blueprints
Description
Mockery In The Black is a 3D first-person horror game created in Unreal Engine. The player wakes up in a Japanese garden and has to avoid the light in order to not attract a giant centipede and escape the garden.
As a note, this was the first time for me in using a commercial game engine of any sort. This game was made all in blueprints.

Inventory System
I implemented an inventory system using one of Unreal's tools, UMG, for the creation of the item icons.
The system would:
-
Be able to keep track of what items were picked up
-
Important, as it needs to work with the checkpoint system
-
-
Update the HUD to display the items the player has
-
Item icons should show the item clearly as well since we didn't have any artist to draw the icons
-
The items being displayed are individually created widgets that were being created from one generic item widget that I made. When an item is picked up, the player HUD creates an item widget by passing the texture and name of the item to the generic widget. The newly created item widget is then added to the player HUD.
Image Capture for Items
Unreal widgets did not allow for static mesh objects to appear as images, they only allow for textures or materials to be set as images. All of our pickups were static mesh objects that our designer had created from Blender, so I couldn't set them as images easily.
I decided to make use of Unreal's scene capture 2D component that came with the blueprints. The component captures a scene from its view and stores the view as an image, which is then used within a material. I was then able to use the material generated to display the images for the item on the HUD. The component by default captures a scene on every frame, but I configured it to only captured the scene when the item it's attached to is picked up.
The advantage of this is that the images show the item in real-time in-game before it was picked up. If the scene capture was set to capture on every frame, then we could see the particles on the items move in real-time on the HUD display as well.


Example of particles on item moving in real-time
Checkpoint System
In order to not have the player restart the whole level upon death, a checkpoint system was needed. The process of creating the system was made slightly easier since Unreal had a blueprint class, SaveGame, that allowed me to save all the information I needed once a player hits a checkpoint I create.
I had wanted the checkpoints to be able to save 5 important information upon hitting a checkpoint:
-
Location of the checkpoint, so player would respawn there upon death
-
Items the player had on them
-
State of the switches, lights, and gates
-
Whether the ladle was filled or not with water
-
Which checkpoint was activated
-
All other checkpoints would be deactivated except the one that was just hit
-
Player would be able to re-activate those deactivated checkpoints
-
Particles for smoke and color effect are deactivated/activated upon touching the checkpoint
Blueprint Snippets
Upon hitting a checkpoint, the checkpoint blueprint would proceed to save all the information listed above to a save game slot which is then stored into the SaveGame object created. The SaveGame object only needed to be created once, upon hitting the very first checkpoint ever, since I could reuse the slot to save information. Upon the player respawning, all game info would be set to what was saved in the SaveGame object.

Scripted Events
Our designers had wanted custom scripted events to help lead the player to where they should go and introduce the centipede in a way that would fit the atmosphere of the game. We decided to create scripted events for both the rat and the centipede.
Scripted Rat
The purpose of the rat was to help lead the player to the path it should be taking.
The blueprint for the scripted rat had to be able to:
-
Travel through all the target points placed down
-
Target points = travel points that the rat will go to
-
Rat will only move to the next target point if the player is within a certain distance of it to prevent the player from losing sight of it
-
-
Disappear once last target point is reached
In addition, a rat trigger zone blueprint was made at the request of our designers. The original design for the rat blueprint required the rat to be placed in the world and it would wait there infinitely until the player was near it.
With the trigger zone, rats would not need to be placed in the world. The player would only have to walk into the zone and a scripted rat would be spawned at the position specified.
Blueprint Snippets
Rat Movement

Trigger Zone

Scripted Centipede
There were a total of 3 scripted events for the centipede, but only 2 are used in the final game. The first one used is where the centipede would spawn at a certain point and travel through all its travel points when the player hits the trigger zone for it. The second one used is where the centipede chases after a rat and once it has captured it, it proceeds to eat the rat.
The blueprint for the scripted centipedes were based on the scripted rat's blueprint with some minor changes to the despawn functionality when it reaches its last travel point and some audio additions as well. I worked on the event where the centipede chases after a rat while one of my teammates worked on the other one.
Blueprint Snippets
Chase Rat

Rat Run Away

User Interface
Using Unreal's UMG tool, I created all the UI elements for the game along with my UI designer.
As production continued we decided to do a full rework of the UI, mainly the main menu, upon the numerous feedback from our playtesters. The original menu was done in all 2D with not much to it. Buttons were paper lanterns and the background was just black, no images or anything, and button placements were awkward. For the rework, we decided to go with a 3D menu with an environment in the background where the camera would swing around between menus.
Initial Main Menu

Final Main Menu

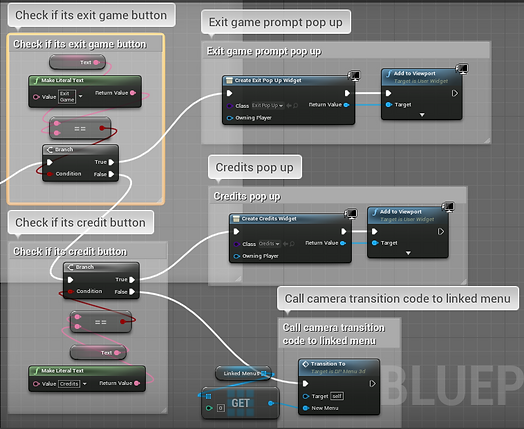
Camera Transitions
I created an actor class that consisted of only the camera, the widget (the menu it should display), camera movement code, and the menu it links to as a variable. I then created a child blueprint of that parent for the buttons. The child blueprint consisted of additional code for sound effects of the button, visual feedback based on the status of the button, and more. When the button is pressed, it would call the camera movement code and pass in the menu it would move to.
Blueprint Snippets
Camera Transition

Part of button press check
I could have most definitely combined the parent and child blueprint into a single blueprint to make the process simpler, but we weren't entirely set on if we wanted to use the buttons that came with the original 2D widgets along with the 3D buttons or use only the 3D buttons for transitions. This led to the creation of 2 separate blueprints that would work with either choice if we ever decided to change.
2D Menus in 3D Space
Using a blueprint I had previously created, I was able to let the 2D widgets be displayed in the 3D world. An issue that occurred when I did this was that I could not interact with the widget at all. I could not move the sliders in the options menu and the words on the menus would clip through the environment.
The cause of this was that the widget was being rendered into the world as a mesh. By changing the space setting in the widget component of the blueprint to screen, it allowed the widget to be rendered to the screen instead. This allowed the player to interact with the sliders and the words would not clip through the environment.

Screen space widgets will only appear when the game is running
Niagara System Particles
I assisted in making some of the particles that were used in our game. For the rat horde that the centipede chases down, there was only one actual rat that was a character blueprint I made. The rest of the rats were a particle that I created using Unreal's Niagara System.

I also assisted in making the fog effect on the fountains. The fountain blueprint contained a lot of particles on it that were on at all times. This caused some performance issues with our game since one level contained about 3 or more fountains at a time. In order to improve the performance, I implemented a simple function that would turn off the fountain particles if the player was too far from them and only turn them on when the player is near.